Personal Siren Projects
Federal Thuderbolt 1000 From Fort Worth, Texas
| Warning Sirens Main Page | Sherman, Thunderbolt 1003 | Arkansas, Thunderbolt 1003 | Fort Worth, Thunderbolt 1000 "Bar Grille" |
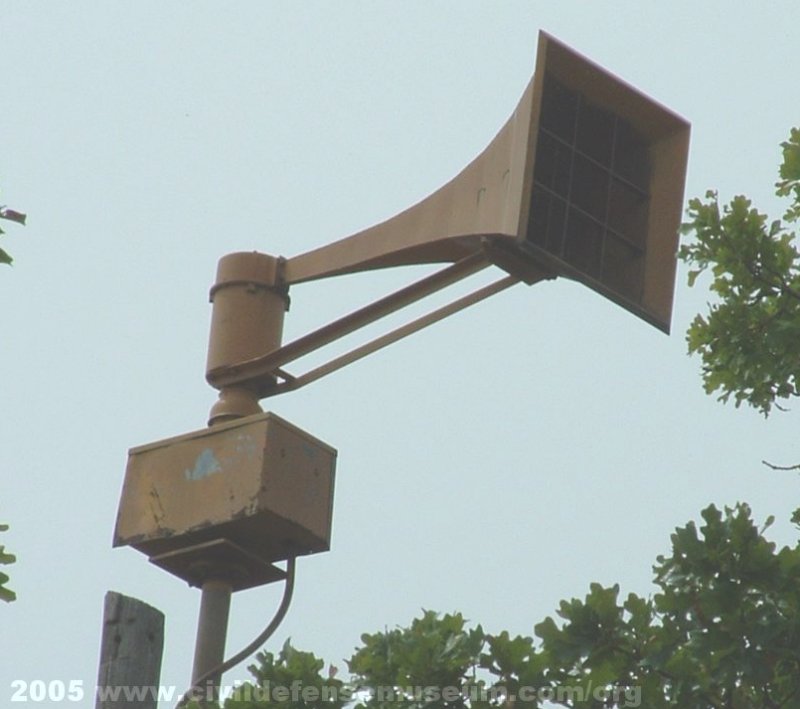
I document the discovery of this old relic found on Fort Worth Texas on my Fort Worth Old Siren System Page 2. This siren was located on Hunting Drive in Fort Worth by the water tower. This street view link shows the siren still in place on the pole https://goo.gl/maps/buMwETjcDdS2. As far as I know this is the only one of Fort Worths old Thunderbolts to have a bar-grille horn. I refer to these very early Thunderbolts as "bar-grille" horns for lack of a better name. I guess they could be called "bar reinforced horns" which is more accurate because the bars go three sets deep into the horn but "bar grille" is shorter. These bars were only used on the very early model Thunderbolt horns.
The chopper/rotator section was the only part of the siren that was removed but I believe the platform and blower still might be in place. This old thing is in pretty rough shape but everything still moved on it when it was taken down. No rusted and seized chopper tube or anything too horrible. The most daunting problem with it is the cracks in the horn. See a summary of everything below...Click Photos To See Larger.
Fort Worth Thunderbolt 1000 Chopper Rotator Run Video
After all the work shown below I was able to do a full chopper/rotator test. Here's the video of the test.
First Problems, Two Broken Chopper Motor Bolts
 |
 |
 |
Shown above in these three photos was the first problem I ran into with this siren. Two of the chopper motor bolts broke off in two of the four chopper tube bosses. See left photo.These bosses have threaded holes where the bolts screw in. I came up with the idea of using a magnet base drill (which I have access to at work) to drill out the bolts. The bolts needed to be drilled out through their holes with a very stable drill on the center of the hole. The only way I could attach the drill magnet base to the chopper tube was to bolt on a plate using the two good thread holes in the opposite bosses of the chopper tube. I got lucky when drilling the bolt out of the left boss because when I drilled it everything was right on center and the bolt was drilled straight through and the remaining threads of the bolt just peeled out of the hole. The right boss was a bit trickier because I ended up having to drill out the threads completely and install a threaded insert (helicoil) in the boss.
Chopper Motor

When I got the chopper motor out I was relieved to see that it was in great condition! The chopper did have some oxidation and was stuck to the stator because the top of the horn gasket was gone and water had leaked through. I wasn't able to try the chopper before this because the wiring was in such bad shape. After cleaning the oxidation off of the chopper and stator I ran the motor and left it as is.
Rotator Box Before Disassebmly

Here is the rotator before disassembly. When Jeb McCranie and Bryan Draper removed the siren they were greeted by a yellowjacket swarm which they delt with with plenty of bug spray. After removing the old motor I shook dead yellowjackes out of it for 15 minutes. Just after taking the siren down Jeb tried moving the gear reducer which still turned by hand. The most unusual thing about his rotator is the gear reducer. I have never seen another Thunderbolt with this type of reducer. The motor appeared to be the orignal three phase motor. All of the wiring was deteriorating badly and the insulation just crumbled when touched.
I didn't notice until later when I tried to install a new rotator motor but this very early rotator box is much smaller than later rotator boxes. The width is the same but the box is only 12" square in height and depth. The front and back panels also have little support tabs attached so they will stay in place while installing the panel hold down screws.

Here is the gear reducer showing how it attaches to the rotator support plate. There's no data plate on the reducer so I have no idea who it was made by. It uses a different mounting bolt pattern than the usual Abart reducer found in Thunderbolts but the rotator plate is drilled and tapped for the Abart reducer as well. I don't know if the early Thunderbolts used both types of reducers or if this was a replacement. If it was a replacement they would have had to completely disassemble the siren and drill and tap the other bolt pattern in a machine shop. That's not something that could have been done in the field.

I really blew it here because I didn't take a photo of the gear reducer when I first disassembled it. The "oil" in it was just minutes away from turning into tar but at least there was still oil in the thing which is why the internal parts were still in good shape. I didn't think there was any way I would get the oil sludge cleaned out but I managed it. Here's a photo of all the parts before I put it back together.
Cracks In Projector Horn

Here is a close view of the reinforcing bars in the horn. As mentioned above, the term "bar grille" isn't accurate because the bars aren't really only a grille. There are three sets of bars with two more sets behind the tic-tac-toe pattern at the horn opening. The most daunting task of trying to restore this siren is going to be trying to repair all of the stress cracks on the horn sheetmetal. I think every bar weld is cracked to some degree with some cracks all the way around the welds.
 |
 |
Here are some of the cracks in the horn sheet metal. There is another stress crack in the middle of the horn throat sheet metal. If there is an easy way to repair these without damaging the horn further I will do it. If trying to braze them will heat and risk distorting the sheet metal I will probably leave them as is. I don't know. Dealing with fixing the cracks is way down the road though. Click Photos To See Larger
Rotator Box After Gearbox Reseal And New Motor

Here is the rotator after reassembly. The gear reducer is resealed and I installed a new single phase rotator motor. The rotator box is so much smaller than later model Thunderbolts that I had to remove the fan and cover from the motor and cut the motor shaft flush with the back of the motor. This rotator won't run for a long enough time period so I don't believe removing the fan will be a problem that will result in the motor getting too hot. Click Photos To See Larger
 |
 |
I also installed a new-old-stock set of collector rings I had left over from a purchase of unused Thunderbolt spare parts I got from Pennsylvania. See left photo.
The right photo above shows the belt side of the rotator. Looks like any other Thunderbolt. I haven't greased the gears yet because I will probably end up taking the rotator apart again.